Capsule pressure gauges
-
Standard design: wetted parts made of copper alloy/brass
-
Stainless steel design: wetted parts made of stainless steel
-
Bayonet ring or clip glass housing made of stainless steel, or plastic housing
-
Measuring ranges from 25 mbar to 1000 mbar pressure/vacuum/manovacuum
-
Connection pipe thread BSP (optional NPT or other)
-
Unfilled (without damping liquid filling)
-
Capsule pressure gauges are only suitable for gaseous media

009
Industrial version
DS 63, DS 100, DS 160
Accuracy: ±1.6% FS
Bajonet ring housing

098
Stainless steel version
DS 63, DS 100, DS 160
Accuracy: ±1.6% FS
Bajonett ring housing

109
Standard version
DS 63, DS 100
Accuracy: ±1.6% FS
Clip glass housing

209
Standard version
DS 50, DS 63, DS 100
Accuracy: ±1.6% FS
Plastic housing
Minimum quantity 25 pieces per version and measuring range
History
Capsule-spring pressure gauges are a special form of diaphragm pressure gauges. The German manufacturer Bernhard Schäffer invented the diaphragm pressure gauge and received a Prussian patent for it in 1849.
Structure and mode of action
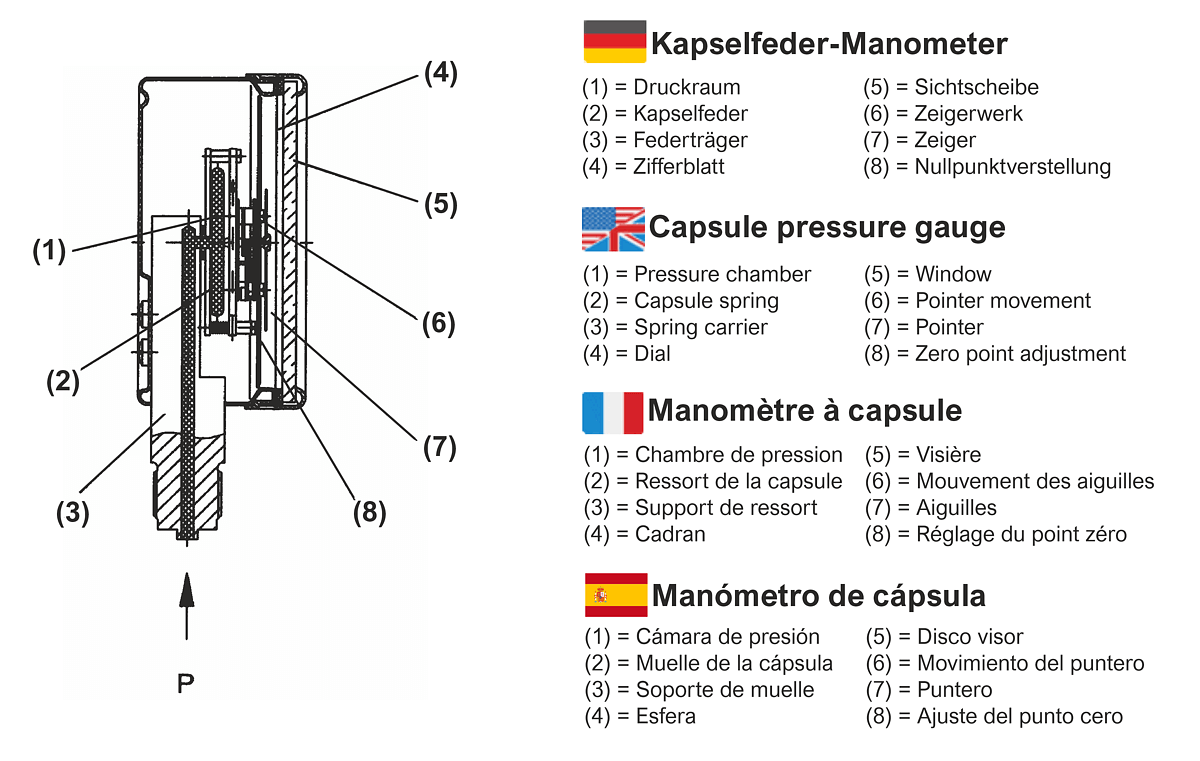
Two diaphragm springs, soldered or welded together at the edge to form a pressure cell, form the capsule spring measuring element. This creates a closed pressure chamber. The pressure enters via the spring socket attached to the capsule spring pressure cell, which is usually screwed in. An increase in pressure inside the capsule spring load cell causes it to expand, resulting in a spring travel proportional to the pressure. This is transmitted to a pointer mechanism mounted directly above the capsule spring. The linear movement of the capsule spring is converted into a rotary movement via a pointer mechanism and displayed on the scale (dial) via the deflection of the gauge pointer.
By placing several capsule spring boxes one behind the other, the spring travel is increased. This achieves greater display accuracy and also enables very low pressures to be measured.
Due to the design and also desired, the relative overpressure is measured with respect to the outside of the capsule spring pressure cell. Thus, from a physical point of view, this measuring principle is always a differential pressure measurement between these two pressures.
Capsule pressure gauges, known as barometers, can be used to measure barometric air pressure. In this variant, the inside of the capsule spring is enclosed in a defined negative pressure and the changing air pressure acts on the outside of the capsule spring. The difference between these two pressures is then measured and displayed. For cost reasons, barometric air pressure gauges are nowadays usually designed in digital/electronic form.
Special features
Capsule springs can be used for display ranges between 4 mbar and 600 mbar (in exceptional cases up to 1000 mbar). For capsule pressure gauges with wetted parts made of copper alloy/brass, from 16 mbar upwards, single-sided capsule spring systems are often used, which are soldered onto a base plate. Stainless steel capsule pressure gauges usually always have a capsule spring pressure cell with traditionally welded diaphragms.
Pointer movements
The gear ratio of the pointer mechanisms is matched to the travel of the capsule springs. They are high-precision precision mechanical components that must meet a number of special requirements: they must be robust, low-wear and low-friction, and must also be able to operate independently of position. The bearing seats of the segment shafts and the pointer axes are made of nickel silver and/or brass or stainless steel and have a very good surface finish. This ensures silky-smooth running of the pointer, minimizes wear and thus increases the service life of the device.
Housing
Housings protect all internal parts of the manometer from mechanical action and contamination. The housings for capsule pressure gauges are made of stainless steel or ABS plastic.
Application
Capsule pressure gauges are the most sensitive of the indicating pressure gauges. Because of the thin-walled materials of the measuring element and pointer mechanism, they are very sensitive to vibrations in the system and pulsations from the measured medium. But safe measurement of very low pressures is well possible. They are suitable for all gaseous and dry pressure media which do not attack the material of the wetted parts and do not crystallize.
Display ranges: 0...25 mbar to 0...1000 bar, -25...0 mbar to -1000...0 mbar as well as manovacuum ranges.
Housing diameters: nominal sizes 50, 63, 100 and 160.
Accuracy classes: Cl. 1.6 and for NG 100 optionally Cl. 1.0
Areas of application
- Mechanical and plant engineering
- Energy supply
- Pump systems
- Chemical and petrochemical industry
- Filter monitoring

